Setting up together PHPStorm, PHPUnit, Xdebug and Docker
Here, I’m going to talk about configuring XDebug with PHPStorm and Docker.
ℹ️ Important note: I will not talk about using it in an HTTP context. I have struggled so much in the past and never succeeded in configuring this, and I will probably never do it anyway.
I’m only using it when testing, with PHPUnit or Behat, and that’s perfect: it forces me to write more tests.
Having a working Docker environment
First of all, if we talk about Docker, you may refer to the series of blog posts I wrote about Docker, it might help you.
I will now consider you have a working PHP + Docker environment.
I also consider you already installed the Docker plugin for your PHPStorm IDE.
Make sure XDebug is available
Of course now you have a working Docker setup, but remember that XDebug must be present.
I usually install it in my Docker images by adding a RUN statement with (echo '' | pecl install xdebug).
This echo thing is a trick to force pecl to execute in a “non-interactive” mode, in order to let the Docker image be built automatically with no user interaction (which is not possible).
If you have PHP 7.2+, you can even make your debug-based test scripts cross-compatible with any platform thanks to extension loading by name
.
TL;DR: it means that you can do php -dzend_extension=xdebug instead of php -dzend_extension=xdebug.so for UNIX and php -dzend_extension=xdebug.dll for Windows. Yeah, it’s just about removing the extension.
To know whether XDebug is available, run php -dzend_extension=xdebug -i | grep xdebug.
If all XDebug options are displayed with their default/configured values, it works!
Start configuring!
Okay, let’s see ALL the steps that I go through to set this up.
First, the PHP interpreter
Let’s consider we have a php container running, configured in our docker-compose.yaml file.
PHPStorm will need a PHP interpreter.
For this, go to the File | Settings | Languages & Frameworks | PHP menu.
You should see something like this:
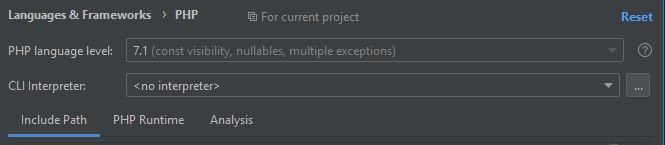
Now, you need to click on the [...] button at the right of the CLI Interpreter section in order to create/use a PHP interpreter.
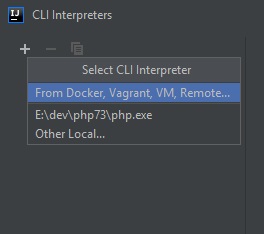
You might have an existing PHP interpreter, but for the sake of the example, I’ll show you how to configure your PHP Docker container.
Add a new “Remote Interpreter” by clicking on the big + sign:
You should configure the remote interpreter to use Docker Compose and have something similar to this:
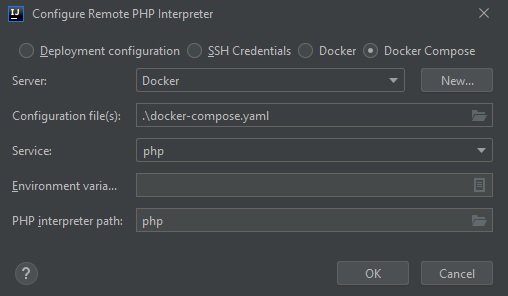
If it comes that you have the Server section to be empty, click on New and you may see something like this:
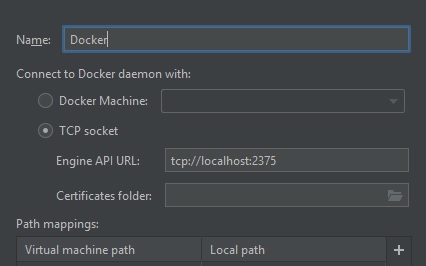
Note: I am using Windows, and I deliberately checked the
Expose daemon on tcp://localhost:2375 without TLScheckbox in Docker For Windows configuration. I may update this post in the future for linux-specific config, so check out your docker machine in the first place to see if it can be linked to PHPStorm instead of using the legacy daemon tcp socket.
Here is my final configuration:
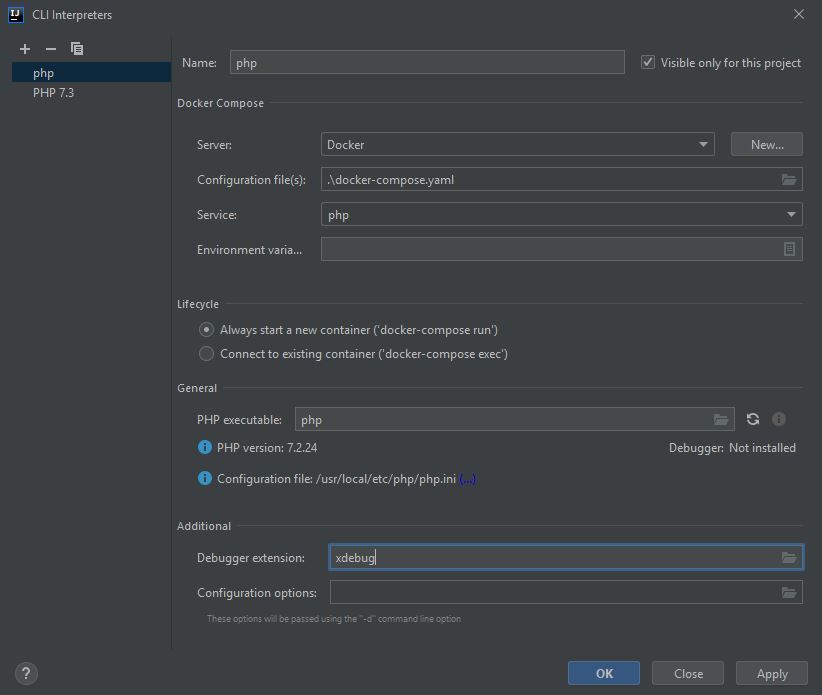
Some notes:
- You should decide on whether you want PHPStorm to use
docker-compose run --rm phpordocker-compose exec php.runguarantees an isolated container, but is slower because it needs to start the container first.execis faster because it connects to a running container, but may have concurrence issues, even though it’s rare (feel free to share experience on that!). - You can add Environment Variables for each interpreter. That’s nice if you want a “test-optimized” or a “profiling-optimized” one, etc.
- Note the
Debugger extensionfield: if you writexdebug(orxdebug.soorxdebug.dllfor PHP<=7.1), PHPStorm will automatically append-dzend_extension=xdebugwhen running a script in “Debug Mode”.
Phew! Now we have PHP, let’s install PHPUnit!
PHPUnit
You may have noticed that I’m a big Symfony fan, so we will take the example of a Symfony project here.
First, I do composer require phpunit. This will install the symfony/test-pack package, which is a package that requires a few other packages, with in particular the symfony/phpunit-bridge package.
The Symfony PHPUnit Bridge component comes with a modified version of PHPUnit (TL;DR: it’s a wrapper around PHPUnit) that will allow you to not require PHPUnit in your composer.json file. This might save some dependencies issues, because PHPUnit and your project might depend on same packages with different versions, and you don’t want that. Apart from that, the component provides some other nice features you may check on the docs.
Apart this “dependencies conflicts” theory, the PHPUnit team decided to use PHP-Scoper for their PHAR version, so if you use the
phpunit.pharfile, you will not have any conflict either, and that’s okay.
The good thing about this is that requiring it like this on a modern Symfony 4/5 project will install the PHPUnit Bridge Flex recipe that commes with a nice bin/phpunit script.
Very convenient for command-line, but don’t use it with PHPStorm (I will talk about this later).
Right after your composer require phpunit, execute bin/phpunit --version.
The wrapper provided by Symfony will install PHPUnit, find a good version for your system.
You can still override the version in the
phpunit.xml.distfile created by the Flex recipe. I personally always update.
By default (as of the time I write this post), PHPUnit is installed via a big composer create-project command (you can find it here) into your bin/.phpunit/phpunit-{version}/ directory.
This point is important, because we will configure the PHPUnit “Run configuration” in PHPStorm by using this specific configuration.
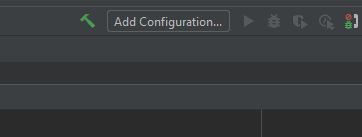
Now! Comes the moment where we move back to PHPStorm!
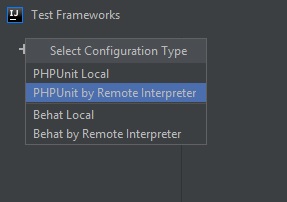
First, click on the Add Configuration... button on the top-right section of your PHPStorm screen:
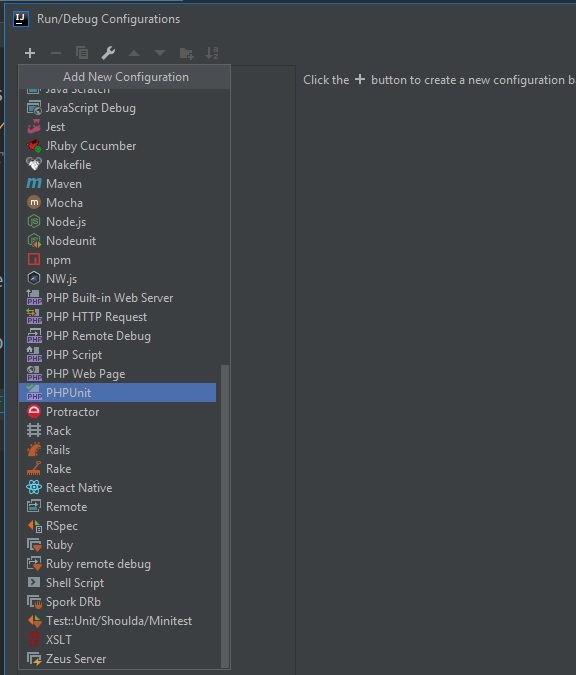
Then, add a PHPUnit configuration:
An empty PHPUnit configuration never works.
PHPStorm needs many things for it to work:
- A working PHP Interpreter
- A way to execute PHPUnit (autoloader, include path, executable…)
- An optional configuration file (but we must set it anyway, else PHPStorm’s PHPUnit process will not use the
phpunit.xml.distfile at all)
So, to make it work, configure PHPUnit:
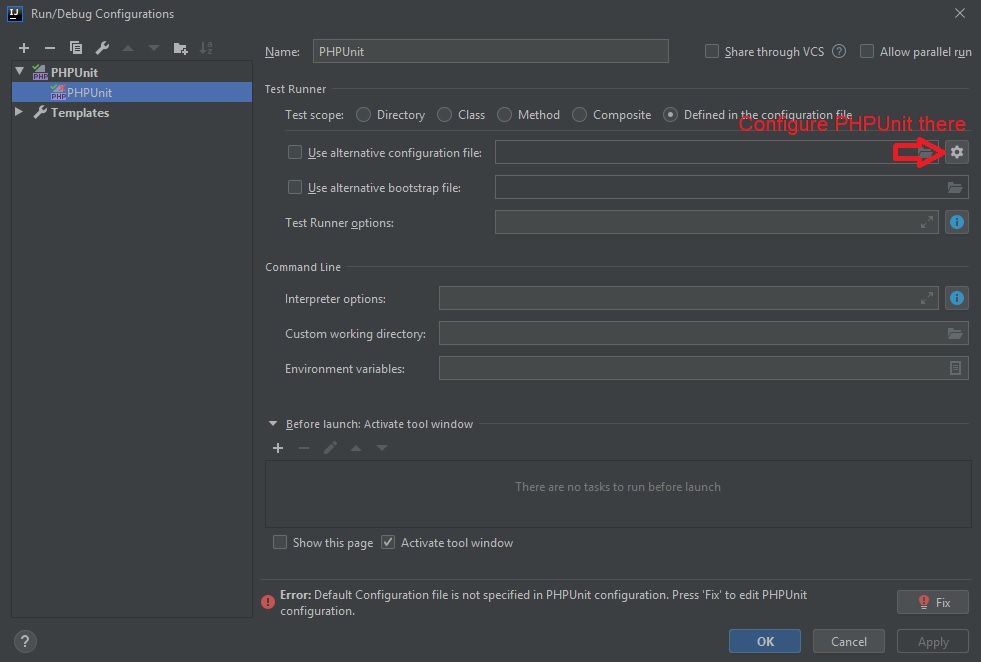
Add a new PHPUnit configuration with a Remote Interpreter:
Select the remote interpreter you created with your Docker configuration.
Then, we will tell PHPStorm to look for the PHPUnit executable.
When we ran bin/phpunit --version, the bridge installed PHPUnit in bin/.phpunit/phpunit-{version}, remember? We will pick the executable from there.
Important: remember that the script path will be inside the Docker container, so be careful about paths.
Also remember to fill the Default configuration file field, else PHPUnit will not use any config.
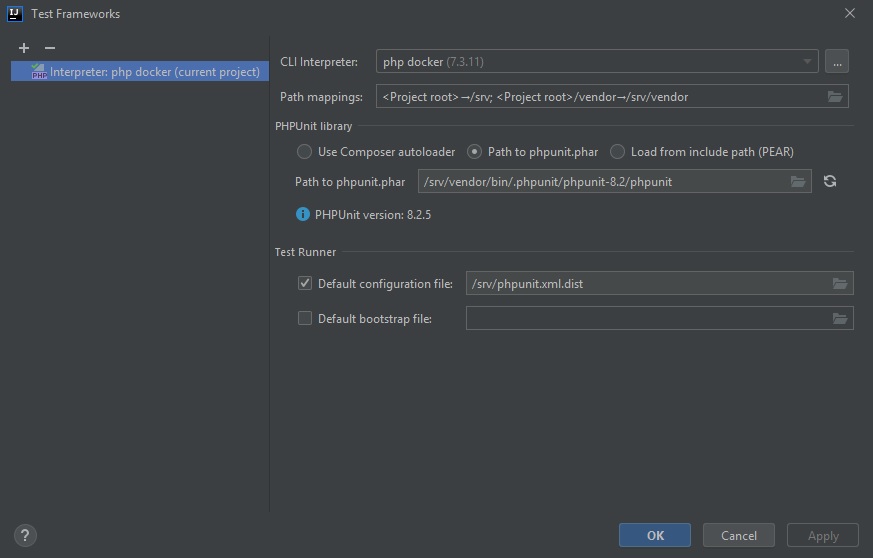
Note: You might have slight differences in paths and versions depending on your Docker and PHPUnit configuration.
After that: PHPUnit is configured!
And for XDebug, we installed it.
Run a PHPUnit script in Debug mode with step-by-step debugging
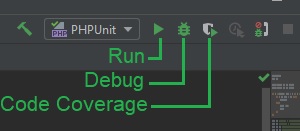
To run in Debug mode, you have the little bug icon next to the “Run” button in your “Run configuration” top bar:
Click on it, and see if your project is tested!
Now, we’ll do step-by-step debugging, thanks to XDebug and PHPStorm’s integration.
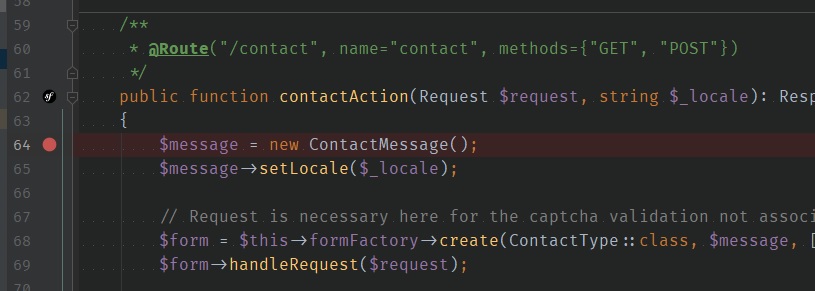
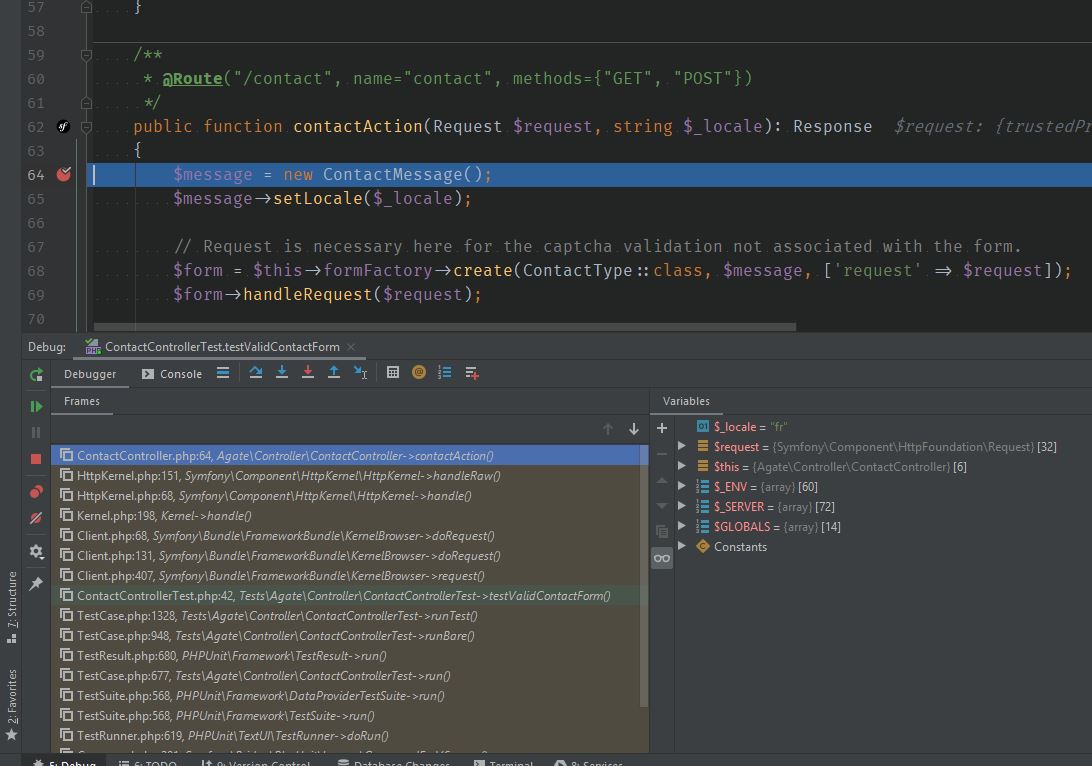
Find some piece of code you want to test, and add a breakpoint. To do so, you can left-click in the left gutter of the line you want to stop by when running the test, or you can also place the cursor on the line and press Ctrl+F8 (Windows keymap).
Now, DEBUG!
The test will execute and PHPStorm will open a brand new tab so you can debug everything: stack trace, variables state, etc.
You can now start your step-by-step debugging, thanks to these buttons:
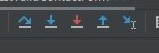
These buttons allow you to execute current line and go to next instruction, step into the function/method call, step out of the current function, etc.
Have fun doing better debugging than dump($var);exit;!
Late notes:
Why do I choose to not use bin/phpunit?
Well, because it simply does not run with PHPStorm.
The reason might be that as it is a wrapper around PHPUnit, Symfony adds features to it (or removes some), especially the one that installs PHPUnit in the first place.
Then, PHPStorm needs to execute this script before finishing the config, because it needs to know which version of PHPUnit is installed (either for auto-completion, autoload, or maybe PHPUnit-specific stuff I am not aware of).
The wrapper does not return the same contents than the native PHPUnit script, so PHPStorm will consider it either not working or incompatible.
This is why I use the native PHPUnit script that is installed by executing bin/phpunit --version