Apache and PHP-FPM in Windows
We see a lot of research over the internet to make Apache & PHP-FPM work on windows.
But the first thing is: there is no php-fpm on Windows. And many people give up on this, because of too many or
too complex solutions we find over the internet.
For sanity reasons, I will never talk about FPM on Windows, but I will instead talk about FastCGI.
Because FPM stands for FastCGI Process Manager. It’s just a manager for FastCGI processes.
So, let’s make a first reminder about how we use to deal with Apache & PHP on Windows, and then we’ll update our setup to FastCGI.
Installing Apache and PHP on Windows
For some people, the Apache service is provided by WampServer, EasyPHP or other *AMP-like setup.
I personally hate these pre-built services because upgrading them is a PITA, and most of the time the setup is not always performant, everything depend on the rest, etc.
In my case, I’m using Apache Lounge which is a stand-alone Apache server for Windows.
Then, I download PHP for Windows on windows.php.net, which can be installed wherever I want.
⚡⚠ Warning: For mod_php, you need the thread safe (ts) version of PHP.
When we’ll install our FastCGI setup, you will have to download PHP again with the non-thread-safe (nts) version.
I personally have both versions installed in php-ts and php-nts directories in my computer, in case of.
I also download a windows version of MariaDB and PostgreSQL for my apps, but it’s not the subject.
All of this decoupled setup is very flexible, and it’s what we need.
Then, let’s configure it.
Before talking about FastCGI, let’s see what we use to do, most of the time.
Configuring Apache and PHP with mod_php: what everyone says
This is really easy to do, because it’s a few lines in our {ApacheLounge}/conf/httpd.conf:
# Load PHP module from our setup.
LoadModule php7_module e:\dev\php71\php7apache2_4.dll

# Custom php.ini file, because it's important to have a different file than the command-line.
PHPIniDir "e:/dev/php71/php-apache.ini"

# And the default config to make Apache run PHP for PHP files.
<FilesMatch ".+\.ph(p[345]?|t|tml)$">
    SetHandler application/x-httpd-php
</FilesMatch>

# Deny access to raw php sources by default
<FilesMatch ".+\.phps$">
    SetHandler application/x-httpd-php-source
    Require all denied
</FilesMatch>

# Deny access to files without filename (e.g. '.php')
<FilesMatch "^\.ph(p[345]?|t|tml|ps)$">
    Require all denied
</FilesMatch>
And that’s all. Just configure a vhost to point on your project and you’re set:
<VirtualHost *:80>
    ServerName 127.0.0.1
    DocumentRoot e:/dev/www
    <Directory e:/dev/www>
        AllowOverride all
        Options Indexes FollowSymLinks MultiViews
        Require all granted
    </Directory>
</VirtualHost>
But here, we’re using mod_php.
Why FastCGI?
It’s well-known that mod_php can have some RAM or CPU issues, that projects with lots of calls at the same time can
suffer from timeouts, memory and cache not managed like we would like to, etc.
Also, using this extension prevents you to have multiple PHP versions installed. Because with mod_php you can have
only one php extension loaded, and only one file handler for the same patterns.
With FastCGI in general, you can configure communication between Apache and PHP in different ways, and especially between virtual hosts. So if you have your PHP 7.1 app and PHP 5.4 legacy bag of crap you want to maintain on your same Windows computer, you’re almost forced to use FastCGI.
The only solution to have multiple PHP versions with Apache and mod_php is to comment/uncomment lines of code in your
httpd.conf everytime you switch projects.
And what if projects communicate together with API calls? Well, you’re f***ed, then…
So, let’s move on to FastCGI.
Configure Apache with FastCGI
First thing to do is to configure apache. We’ll configure PHP later.
Lucky we are: it’s even easier than with mod_php.
You can remove all the mod_php config we added before. We’ll replace it with another config. And it was just a
reminder, because it’s cool to know what whe’re doing.
Open your httpd.conf file, and after removing all mod_php garbage, activate these two extensions:
LoadModule proxy_module modules/mod_proxy.so
LoadModule proxy_fcgi_module modules/mod_proxy_fcgi.so
The proxy module is here to help us using Apache like a proxy.
Nothing fancy here. If we want to explain it simply, let’s say that Apache will sort of be able to delegate some HTTP requests to another service via a protocol (and this service will sometimes be called a gateway).
The proxy_fcgi module is just here to add the fcgi protocol to the Proxy, so we can communicate with a gateway by
using this protocol. But we could have been using other protocols for other needs, like ftp, http or even ws
(web-sockets).
When FastCGI proxy is enabled, let’s tell Apache we want to use our PHP config:
<Files ~ "\.php$">
    SetHandler "proxy:fcgi://127.0.0.1:9000#"
</Files>
Ok, the PHP config is not ready yet, but what these likes say is that any file matching \.(php|phtml)$ will tell
Apache to handle the request via a proxy, that will use the fcgi protocol to send the HTTP request to 127.0.0.1.
The port 9000 is the one we’ll use in our PHP config, and it’s the default one used in php-fpm in unix systems.
And the # seems to come from an issue inside Apache modules that do not send the correct path to the gateway, and this
issue is fixed by adding this character at the end of the handler’s url.
That’s all. We can leave our Apache config and move to PHP one.
Configure PHP CGI module
CGI is very old (1993) and cool. It’s an interface for HTTP servers to be able to execute another program instead of just displaying the resource asked by the user.
In short words, it’s meant to execute our PHP files instead of just showing the PHP file’s content.
It’s a protocol which is really nice when dealing with stuff like interpreted languages like PHP, Ruby, etc., because it allow us to just use our web-server without knowing what it does so we don’t learn anything about HTTP web servers and how our interpreters work. It’s a nice jump into “Damn it doesn’t work!” instead of “I probably did something wrong, let’s fix this.”.
Just a small reminder: I said in the Installing Apache and PHP on Windows part
that here you must have the nts version of PHP. Make sure you have the right one starting from her.
Well, we have many options, but I’ll talk about options later.
We need PHP to be run as a service. Dammit, what’s a service in Windows ?
It’s a specific type of process that runs sort of “in the background” in order to process tasks, pop alerts, monitor, or just make your computer works.
Somehow they can be similarly compared to what you have in your /etc/init.d in unix systems. But it’s not the same.
Because you know, difference between UNIX and NT stuff, etc.
Why run it as service? Because else, you would have to double-click on the CGI script, and make sure the cmd window is
not closed, and restarting it will be boring, etc.
Having a service is nice because we can just restart it in the “Services” panel if we need, and it can be automatically
launched on Windows startup.
Create the CGI service
To create a service, we could run into the sc command in Windows, but I find it very neat that we can setup a service
without torturing ourselves.
So I’m using NSSM to manage my personal services.
It’s great because I’ve set up PHP-CGI, Apache, MariaDB and Blackfire Agent with it, and it’s lovely.
So, download this small executable, run nssm install, and a cool popup will show.
You’ll fill a few options:
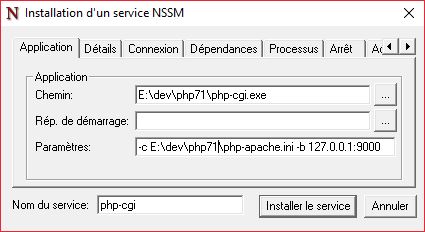
Just an explanation about the options:
php-cgi.exeis the script we must execute.php.exeis a command-line interface (CLI), not a CGI one.-c E:\dev\php71\php-apache.iniis used to specify ourphp.inifile. I named it like this, but you can change it if you like.-b 127.0.0.1:9000is the IP and port that PHP CGI will listen to. We need it to be as closed as possible, so we only allow requests corresponding to127.0.0.1. And as said when configuring Apache,9000is the default port for thephp-fpmunix config, so let’s use it because it’s a common thing.
That’s all!
Now your project should work.
More flexibility: multiple PHP versions with Apache
This is often asked, so let’s see how we can handle this.
First, if you have multiple PHP versions, you must create multiple php-cgi services, so this is why nssm is
really nice: it’s as easy as two lines of config. Just create a new service pointing to your other PHP version, and
change the port to 9001, 9002 or whatever you like that does not conflict with any other software.
Then, you will have to remove the SetHandler config from httpd.conf and move it to your vhosts, like this:
<VirtualHost *:80>
    # Our PHP 7.1 application, using the first cgi module listening to port 9000
    ServerName php71-app.dev
    DocumentRoot e:/dev/www/app1
    <Files ~ "\.(php|phtml)$">
        SetHandler "proxy:fcgi://127.0.0.1:9000#"
    </Files>
    <Directory e:/dev/www/app1>
        AllowOverride all
        Options Indexes FollowSymLinks MultiViews
        Require all granted
    </Directory>
</VirtualHost>

<VirtualHost *:80>
    # Our PHP 5.4 application, using the second cgi module listening to port 9001
    ServerName php54-app.dev
    DocumentRoot e:/dev/www/app2
    <Files ~ "\.(php|phtml)$">
        SetHandler "proxy:fcgi://127.0.0.1:9001#"
    </Files>
    <Directory e:/dev/www/app2>
        AllowOverride all
        Options Indexes FollowSymLinks MultiViews
        Require all granted
    </Directory>
</VirtualHost>
That’s it, now you can enjoy having multiple PHP versions!
⚠️ If you’re using Apache 2.4.25+, you must specify this directive:
ProxyFCGIBackendType GENERIC
Only necessary for Apache 2.4.26 and higher versions, because this release introduced a new behavior in the FCGI
protocol handled by the mod_proxy_fcgi module.
If you don’t specify this directive, you will encounter a No input file specified. error, because it’s related to some
proxy:fcgi:// string that’s passed to PHP that is not interpreted correctly.
This behavior is not needed when using Apache + php-fpm, because we can rely on a unix socket.