Setup a dnsmasq equivalent on Windows (with Acrylic)
Last modified: 2018-08-27 09:56
Edit (2018-08-27): I stopped using Acrylic, it was quite unstable and was not working well. I probably messed up
something in the configuration and I ended up using the C:\Windows\System32\drivers\etc\hosts file…
The problem I had was that the DNS worked for my own domains but it did not for all others. I could not even open github.com…
If you have any idea on how to make it work 100% times, please send an e-mail!
There are a lot of searches about a “Windows dnsmasq equivalent” on the web.
Actually, it’s a problem only because doesn’t have a “publicly configurable DNS local resolution” system. But in fact,
Unix don’t have either, that’s why we’re using dnsmasq.
To make this possible, I tried several tools, and one took my attention: Acrylic.
It’s as simple as dnsmasq, so let’s spread the word!
Install Acrylic DNS Proxy Home Page
Current link to Acrylic is the following: http://mayakron.altervista.org/wikibase/show.php?id=AcrylicHome
For any dead link, please contact me so I can update one (or warn if the software is unavailable).
I personally like the idea of a portable dev environment, so I downloaded the “Portable” version of the software.
Install it wherever you want, and you’re set to configure it.
Configure Acrylic
On Windows, DNS configuration is boring. But what we just want today is to redirect every *.dev and *.docker domain
names to 127.0.0.1, because let’s make it simple, it’s stupid enough to set up EVERY domain in the system’s host file
at C:\Windows\System32\drivers\etc\hosts.
So, open the AcrylicConfiguration.ini file, change the PrimaryServerAddress config to not use Google’s DNS. Instead,
prefer using OpenDNS ones. Not GAFA, you know (but still Cisco, though).
You’re also free to change all SecondaryServerAddress, TernaryServerAddress, etc., up to the amount of DNS servers
you like.
Close this file, and open another one: AcrylicHosts.txt. There, it’s like a Windows hosts file, but on steroids.
Add one single rule:
# AcrylicHosts.txt
## ...
# Put this line at the bottom of the file:
127.0.0.1 *.dev *.docker # <-- Just this rule is enough for us today
Almost finished!
Setup Acrylic as service
Acrylic DNS proxy comes with lots of .bat files that are just aliases to the AcrylicController.exe binary. It’s a
nice entry point to Acrylic’s config, even though it’s not 100% documented, we have the basic ideas on how everything
works.
Run the InstallAcrylicService.bat script, to install Acrylic as a Windows service.
Note: It may not show or output anything. In this case, start a cmd terminal, and execute the script directly in
the command line. And if it still doesn’t work, run it as administrator.
The service should be running. To check this, we can run this command:
$ sc query AcrylicServiceController

SERVICE_NAME: AcrylicServiceController
        TYPE               : 10  WIN32_OWN_PROCESS
        STATE              : 4  RUNNING                    # <------- Means it's working! \o/
                                (STOPPABLE, NOT_PAUSABLE, ACCEPTS_SHUTDOWN)
        WIN32_EXIT_CODE    : 0  (0x0)
        SERVICE_EXIT_CODE  : 0  (0x0)
        CHECKPOINT         : 0x0
        WAIT_HINT          : 0x0
Setup Windows to point to Acrylic before using other DNS resolution
This is where it becomes “windows-related”. Windows allows to configure DNS servers in your network config.
So, depending on your Windows version, find your connection configuration to have something like this: (sorry it’s in French)
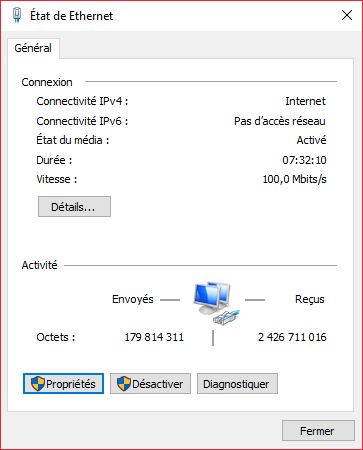
Once you have this, go to “Properties” (the selected link on the above image).
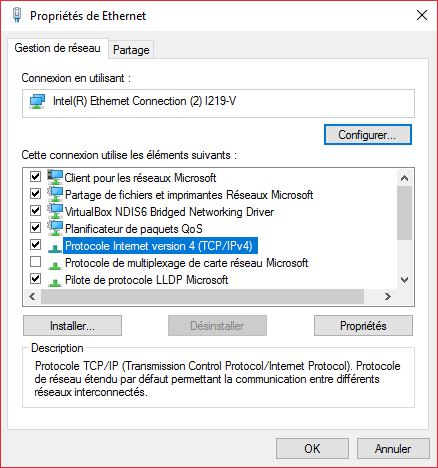
In the “Properties” tab, whatever your config is, you will always be able to go to IPV4 configuration. Let’s go.
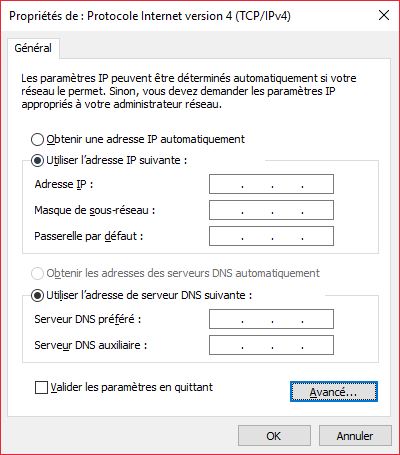
And then you will have access to IPV4, but once again, we want more advanced stuff, so let’s click “Advanced”, whatever the config you have:
Go directly to the DNS tab, and you should see something like this:
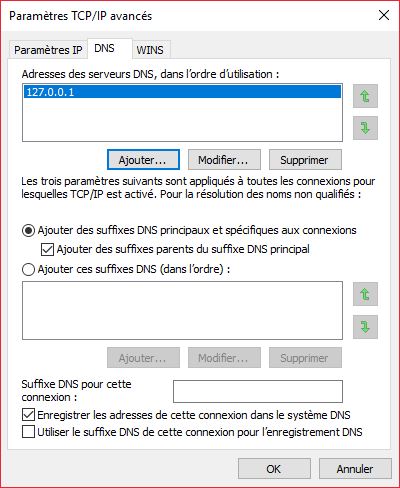
Keep the defaults on every option, but in the DNS servers addresses, add 127.0.0.1, and make it the first in
the DNS list. If you have more DNS, let them be used after Acrylic’s one.
Acrylic should run over the 127.0.0.1 IP address, and under the port 53, which is standard,
IIUC.
Then, it’s finished!
Now, when you ping on any .dev or .docker domain, you’ll see that it’s interpreted as 127.0.0.1!
$ ping suchwow.dev

Envoi d’une requête 'ping' sur suchwow.dev [127.0.0.1] avec 32 octets de données :
Réponse de 127.0.0.1 : octets=32 temps<1ms TTL=128